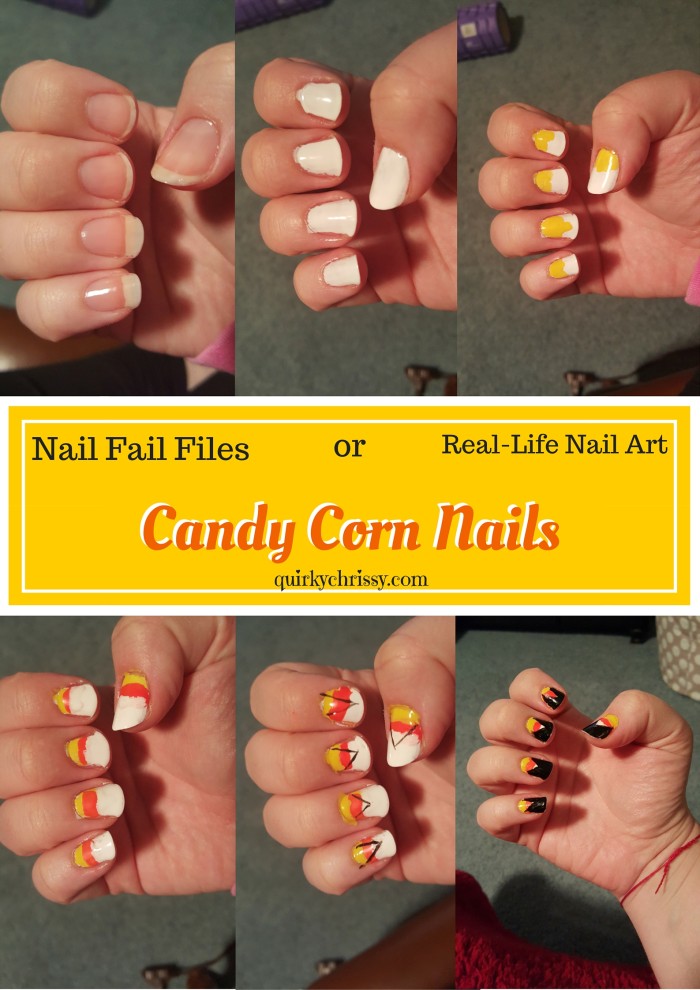
Guys, I think it’s time I showed you some of my less than awesome attempts at nail art. I saw this awesome tutorial from my friends at Julep, and I thought. Well, shit. I can totally do that. In fact, I can make it even better!
PRETTY SPOOKY – Easy (so they say) Halloween Nail Tutorial from Julep
Okay, so to be fair, if I used just one color under the black to give it that cool orange flame-like appearance, I probably would have been fine. Instead, I decided to take it to the next level. I made sure over the course of the last year to acquire the colors to make candy corn nails when Halloween rolled around this year, and I thought I would combine the two looks. I’ll show you the tutorial first.
Here are the steps to this easy orange-and-black mani:
1. Paint one coat of orange 2/3 of the way up your nail. Let dry. (The drying part is really important, even if you’re impatient like me.)
2. Using a striping tool (some people say a toothpick works, but seriously, though…I’ve never figured out how to do that…so striping brush it is) to polish on black borders.
3. Polish the outline of the points with one coat of black polish. This is trickier than it looks. I actually used the striping tool to paint borders near my cuticles too.
4. Add a top coat and you’re done!
Doesn’t that look ridiculously easy? This Halloween nail art tutorial from Julep uses colors from their Happy Halloween Welcome Box, which is a 4-piece beauty box featuring a trio of spooky polishes and a gel eye glider (which I LOVE) for FREE when you join the Julep beauty box subscription. Join Maven and get the 4-piece Pretty Spooky Welcome Box FREE ($50+ value) – just pay $2.99 shipping with code BOO. Or pre-pay for your first three months of Maven and get the Welcome Box and shipping FREE.
 Now for the pictures you’ve been waiting for:
 Okay, so in the grand scheme of things, this really wasn’t that bad, right? I mean, sure…some of the candy corn kernels are crooked, and there may be some white missing…but I mean…this is real life, not some fancy-pants nail artist, amiright?
Things I would do differently:
- Wait a good long time for each layer to dry. Be patient and watch more 30 Rock.
- Try to aim for the same angle with the border lines.
- Not overthink the different colors of the candy corn. I ended up painting over spots and multiplying the layers which you can kind of see and wasn’t necessary.
OH! And bonus!
If you’re not into the monthly subscription thing, or you want a cool striping brush (I use this thing a lot for my nail art), right now you get sweet Halloween Nail Art sets at Julep.
 Get inspired by the spooky-cute nail art ideas from my friends at Julep and then score the polishes used in these looks way cheaper than normal. Julep is offering five limited-time Halloween Nail Art sets that include three polishes AND a creativity kit (a dotting tool and striping brush).
Plus, you’ll get a free as a gift with purchase when you buy a Halloween Nail Art set. The Julep Plié Wand™ is the perfect tool to help you perfect your nail art designs, especially when you’re using your ‘bad’ hand. To get your free Plié Wand, add a set to your cart then use the code MAGIC at checkout.*
What’s the worst tutorial fail that you’ve had? Any nail art designs have you played around with? Are you as adventurous with attempting nail art (and failing somewhat miserably) as me? Do you know how to use a toothpick for striping?
Disclosure: No one paid me to say nice things, but I am a Julep affiliate and any purchases you make through these links will afford me a small commission to keep doing these tutorials and fail files.


2 Responses
very cool
Glad you like it! <3